
I just found this awesome Amigurumi Hair Tutorial from Owly and Short Hair Tutorial from Geek Central Station.
Updated 21 Oct `08:
Found this awesome hair tutorial by Creepy Cute Crochet today.

|

|

|

|
Showing posts with label Step by Step Guide to Making Your Own Amigurumi. Show all posts
Showing posts with label Step by Step Guide to Making Your Own Amigurumi. Show all posts
Tuesday, May 27, 2008
Step Nine: Hair

Step Eight: Changing Colours
There are some patterns that require you to change colours as you crochet, or perhaps you simply want to try changing colours just because you want to. Well, if you don't know how to yet, here is a tutorial from Planet June, and also videos regarding colours from hookandneedles (halfway down the page).
Step Seven: The Eyes
There are many ways to give your ami its eyes.
1. Use safety eyes. It is best for those ami that you intend to give to small children. An example is from Suncatcher Eyes (this site has some free patterns too!).

For this Worm free pattern from Suncatcher Eyes click here.
2. Simply stitch them on.

Picture from Tanya Dawn.
3. Cut out some circles from felt or fabric and sew/glue them on. Don't use washable glue please, use the glue gun. (Thanks to unicorn37757 over at crochetville for reminding me)

Picture from t0fugurl.
4. Use wiggly eyes.
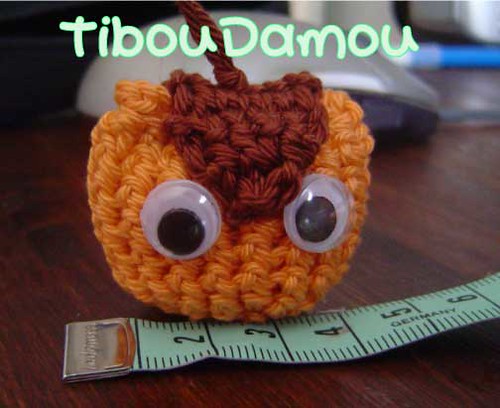
Picture from Maman de Celia & Alice.
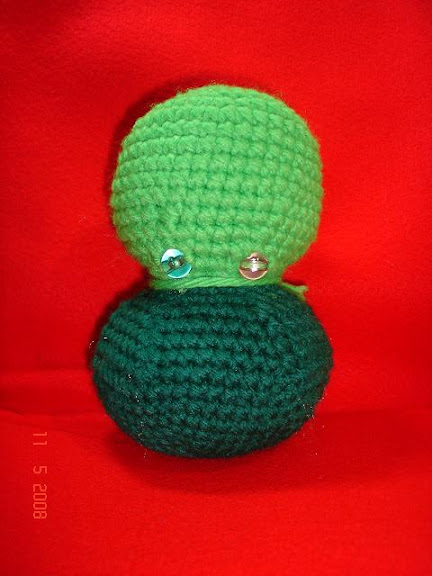
5. Insert some beads in between the stitches at the appropriate place. I learnt this method from the same video that I posted in Step Two. Plus side, definitely very safe. Minus side, once it's in, no way to get it out. So, a word of caution. Do this only when you are absolutely sure that you're placing it exactly where you want it to be.
Anyway, I used this method for this amigurumi I've made, obvious to see that I've placed the eyes too low! (Click on the pic to see my post about it on the other blog)
6. Sew a button on.

(Edited to add this pic by rengawk).
7. Anybody has anything more to add?
Edited to add 21 Oct '08:
I found this fantastic eye-painting tutorial from MyGurumi.
Step Six: Joining Amigurumi
Almost all amigurumi patterns require you to join separate pieces into one. No need to worry though, it is not difficult to do, especially after seeing this tutorial from PlanetJune or Kim Werker.
Monday, May 26, 2008
Step Five: Stuffing
The number one stuffing that amigurumi makers usually use is polyfill.
Why? Because it is washable, and unlike cotton, it won't go 'stale' (lose volume) and as some of the people over at Crochetville said, cotton can attract 'critters'.
Most ami tutorials will tell you to stuff until you can't stuff it anymore, then stuff some more. The reason is of course to add more volume and stiffness to your ami.
A note for polyfill, the fact that it is tiny strands of plastic makes it easy to stick out of the ami. Unless you feel confident that your ami is tight enough that none will stick out, you can use some leftover fabric to make a bag for the polyfill before stuffing it into your ami. This is especially important when you want to give the ami to small children or pets. You don't want any bits to go inside their mouth or noses.
This Fiber Poly Fill from Bean Products is made from recycled soda bottles. Why not? We can save the planet at the same time.
When you want more weight for the ami, use plastic pellets.
When you are making a leg-less ami, and you want it to sit upright, you can insert a pebble or something similar at the bottom. Just don't forget that if you're giving the ami to small children, it's not a good idea to give them something they can hurt themselves with.
And while you're at it, why not fill your ami with leftover yarns? Those really short ones that you can't make anything with and you just can't throw away. You can do the same thing with leftover fabrics or anything similar too.
One last suggestion, you can use plastic bags to fill your ami. It is some form of recycling, though I'm not sure if it is washable. I mean, it is plastic, but it may retain the water and spoil things. Just make sure it is really dry after you wash them then, I suppose.
Why? Because it is washable, and unlike cotton, it won't go 'stale' (lose volume) and as some of the people over at Crochetville said, cotton can attract 'critters'.
Most ami tutorials will tell you to stuff until you can't stuff it anymore, then stuff some more. The reason is of course to add more volume and stiffness to your ami.
A note for polyfill, the fact that it is tiny strands of plastic makes it easy to stick out of the ami. Unless you feel confident that your ami is tight enough that none will stick out, you can use some leftover fabric to make a bag for the polyfill before stuffing it into your ami. This is especially important when you want to give the ami to small children or pets. You don't want any bits to go inside their mouth or noses.
This Fiber Poly Fill from Bean Products is made from recycled soda bottles. Why not? We can save the planet at the same time.
When you want more weight for the ami, use plastic pellets.
When you are making a leg-less ami, and you want it to sit upright, you can insert a pebble or something similar at the bottom. Just don't forget that if you're giving the ami to small children, it's not a good idea to give them something they can hurt themselves with.
And while you're at it, why not fill your ami with leftover yarns? Those really short ones that you can't make anything with and you just can't throw away. You can do the same thing with leftover fabrics or anything similar too.
One last suggestion, you can use plastic bags to fill your ami. It is some form of recycling, though I'm not sure if it is washable. I mean, it is plastic, but it may retain the water and spoil things. Just make sure it is really dry after you wash them then, I suppose.
Sunday, May 25, 2008
Step Four: Magic Ring
Up until now perhaps you have started your amigurumi by crocheting 2 chains and then doing 6 sc in the second chain from hook.
If you are frustrated by how irregular it makes your starting circle looks, then it is time to learn the magic ring.
The Magic ring is also the way to start so that you have no hole in the middle.
Below are the links to the best magic ring tutorials I've found from PlanetJune and crochetme:
1. Magic ring for the right-handed here or here.
2. Magic ring for the left-handed here.
You can also see the video tutorial from tjw1963 at youtube.
There is also the Double Ring tutorial from crochetme.
And the video tutorial at youtube from febielin.
It is not difficult I promise, you'll fall in love with the magic ring at once and might not ever go back to the old method again.
If you are frustrated by how irregular it makes your starting circle looks, then it is time to learn the magic ring.
The Magic ring is also the way to start so that you have no hole in the middle.
Below are the links to the best magic ring tutorials I've found from PlanetJune and crochetme:
1. Magic ring for the right-handed here or here.
2. Magic ring for the left-handed here.
You can also see the video tutorial from tjw1963 at youtube.
There is also the Double Ring tutorial from crochetme.
And the video tutorial at youtube from febielin.
It is not difficult I promise, you'll fall in love with the magic ring at once and might not ever go back to the old method again.
Step Three: Making a Ball
Step Two: Learning the Stitches
There are only 3 kinds of basic stitches that you need to know to make your own Amigurumi:
1. sc = single crochet
2. inc = increase
3. dec = decrease
additional = slip stitch (usually used to make invisible join)
Here are the links to the best tutorials I've found on the net:
1. For all the basic things that you need to know from hookandneedles.com: Part 1 (How to crochet), Part 2 (How to read patterns)
2. How to Start Amigurumi from MyGurumi (3 ways of beginning crocheting in the round).
3. How to shape and Decrease Invisibly from MyGurumi.
4. Invisible decrease tutorial from falwyn.wordpress.com
5. The first videos from youtube that I learnt amigurumi from: wiremysoul part1 and part2
I found this wonderful amigurumi tutorial for knitters from geckogrrl: Part 1 & Part 2.
Some notes:
1. Always work on both loops unless the pattern states otherwise (could be outer loops only or inner loops only).
2. The stitch marker is very very very important! Don't forget to place your stitch marker at the beginning of every round so that you can focus on doing the routine (example: [1 sc, 1 inc] around). You CAN count while crocheting, but it too very easy to forget. Believe me, it happens.
3. Make sure you count the total number of stitches after you reached the beginning of your round (where your stitch marker is). You don't want to find some miscount afterwards. The only thing left to do is rip them off until you can find where you change the pattern (i.e. 1 sc 1 inc or 2 sc 1 inc). So please PLEASE do check every round. Note: Another thing you can do is leave your stitch markers one or more rows down.
4. Always turn your amigurumi inside out.
You might also want to read Amigurumi Deconstructed from crochetme.
Updated: I just found this series of Amigurumi tutorials from Roxycraft!
1. sc = single crochet
2. inc = increase
3. dec = decrease
additional = slip stitch (usually used to make invisible join)
Here are the links to the best tutorials I've found on the net:
1. For all the basic things that you need to know from hookandneedles.com: Part 1 (How to crochet), Part 2 (How to read patterns)
2. How to Start Amigurumi from MyGurumi (3 ways of beginning crocheting in the round).
3. How to shape and Decrease Invisibly from MyGurumi.
4. Invisible decrease tutorial from falwyn.wordpress.com
5. The first videos from youtube that I learnt amigurumi from: wiremysoul part1 and part2
I found this wonderful amigurumi tutorial for knitters from geckogrrl: Part 1 & Part 2.
Some notes:
1. Always work on both loops unless the pattern states otherwise (could be outer loops only or inner loops only).
2. The stitch marker is very very very important! Don't forget to place your stitch marker at the beginning of every round so that you can focus on doing the routine (example: [1 sc, 1 inc] around). You CAN count while crocheting, but it too very easy to forget. Believe me, it happens.
3. Make sure you count the total number of stitches after you reached the beginning of your round (where your stitch marker is). You don't want to find some miscount afterwards. The only thing left to do is rip them off until you can find where you change the pattern (i.e. 1 sc 1 inc or 2 sc 1 inc). So please PLEASE do check every round. Note: Another thing you can do is leave your stitch markers one or more rows down.
4. Always turn your amigurumi inside out.
You might also want to read Amigurumi Deconstructed from crochetme.
Updated: I just found this series of Amigurumi tutorials from Roxycraft!
Friday, May 23, 2008
Step One: Supplies!
The first thing you need before embarking on your Amigurumi-making journey is of course, the tools and materials.
There's not much needed, only:
1. A ball of yarn, may it be cotton, or wool, or acrylic, whatever you like.
2. A crochet hook to match.
The basic rule of thumb is to use a chochet hook that is slightly smaller than is usually used for the particular type of yarn, for the purpose of making stitches that are sufficiently tight so that the stuffing won't stick out.
Now, for Worsted Weight Yarn, you can use 5mm (size H) or 4mm (size G) hook.
For Sport Weight Yarn, you can use 3,75mm (size F) hook.
This site from lovetoknow.com lists plenty of helpful links to various types of Crochet Hook Size Conversion tables.
And there is a downloadable pdf about choosing crochet hook and yarn here.
And another guide about yarn weight and hook here.
There's not much needed, only:
1. A ball of yarn, may it be cotton, or wool, or acrylic, whatever you like.
2. A crochet hook to match.
The basic rule of thumb is to use a chochet hook that is slightly smaller than is usually used for the particular type of yarn, for the purpose of making stitches that are sufficiently tight so that the stuffing won't stick out.
Now, for Worsted Weight Yarn, you can use 5mm (size H) or 4mm (size G) hook.
For Sport Weight Yarn, you can use 3,75mm (size F) hook.
This site from lovetoknow.com lists plenty of helpful links to various types of Crochet Hook Size Conversion tables.
And there is a downloadable pdf about choosing crochet hook and yarn here.
And another guide about yarn weight and hook here.
Subscribe to:
Posts (Atom)

 Posts
Posts


 Stumble It!