Showing posts with label free crochet pattern. Show all posts

Thursday, February 18, 2021

Wednesday, December 16, 2020

Snowflake Interlocking Crochet Pattern

Hi everyone, I don't feel like writing much today. Just want to share this with you.

Front side

Back side

Diagram pattern. 

Have fun!

Thursday, November 5, 2020

First Ever Interlocking Crochet Pattern I Made


So proud, I finally got the hang of drawing my own Interlocking Crochet pattern. After a few weird tries. LOL
I made an unintentional mistake when I crocheted this but I decided to leave it.
Anyway, not much else to say, let's get to the diagram shall we?
Have fun!

Sunday, July 22, 2012

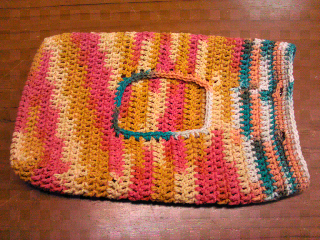
Wet Wipes Travel Pack Cover

Pattern:
For bottom, ch 25
Ch3, turn, dc across. 3x
Start going round to go up for body, 2dc in each side of dc (total 6 dc for the short side. Dc across the other side of the first ch25. 2dc in each side of dc. Join on the third ch of the third row of dc. (Total 62 sts)
Dc around for another 9 rounds. No need to turn.
Sl st 9x, (ch3, turn, dc 52x.) 9X
On 9th round, do not turn, ch 9 and join to close gbap.
Ch3, dc around 6 rounds. No need to turn.
Ch1, sc around for 2 rounds. Join n sl st once to
make button hole. Ch1, sc 51 sts, ch 2 for 2nd button hole, sc 7 sts, ch2, join at first sc.
Ch1, sc around for 2 rounds. Cast off
Join anywhere you like at the hole in the middle and sc around, with 2 sc in each side of dc. Total 59 sts.
Sew buttons at 8-9th sts and 16-17th sts.
I used cotton yarn n hook 2.5mm.
Weight 34 grams.


Closer look on buttons

Saturday, July 21, 2012

Tissue Box Cover

Pattern:
Ch52.
Ch3, dc across for 6 rows. Turn after each row.
Ch3, dc 14 sts, (ch 3, turn, dc 14sts) 2 rows. Cast off.
Join at 52-15 sts at the other side. (ch 3, turn, dc 14sts) 4 rows. Do not cut yarn, Ch 22 and continue dc 15x at the other side.
Ch3, dc across for 7 rows. Turn after each row. Do not cut yarn. Immediately turn to the side to start going around for the body. Continue 2dc in each side of dc (total 32 dc at the side), dc across at the other side of first ch52, continue 2dc in each side of dc (32 sts).
Join at third ch of the beginning of seventh row of dc to finish one round for body.
Ch3, dc around (total 168 sts). Do not need to turn after each row. Make as many rows as you need until the whole body of box is covered.
Ch1, sc around for one row.

For this I used cotton yarn and hook 2.5mm.
The box is paseo 120 sheets.
Weight 50 grams.


Sunday, November 7, 2010

Baby Glove Crochet Pattern

Hey people... It's been a long time since I updated this blog. Been very busy with my new shop and all...
Anyway, I just had a new niece last week and I wanted to make her a baby glove, so I looked for a pattern. The one I got turns out to be too big for my yarn and hook so I modified it.
Well, I'm sure it's a very common pattern that you can get anywhere but I'm just gonna write it here anyway, even if only for my own notes.

Start with magic circle
Row 1: ch 3, dc 15 times (total 16), join with sl st
Row 2: ch 3, 2dc in every stitch, join
Row 3: ch 3, *2dc, dc* rep around, join
Row 4 : ch 3, dc around, join (if yours is not big enough, do another increase with *2dc, dc, dc*)
Row 5 - 10 : ch 3, dc around, join
Row 11 : ch 3, *dc decrease, dc* around, join
Row 12 - 13 : ch 1, sc around, join
Row 14 : *sc, sk 2, ch 3* around, join
Row 15 : sl st to first sp, ch 3, dc, ch 2, 2dc, *2dc, ch2, 2dc* in each sp around, join

Finish! Add a ribbon to the space so that you can tie it up, or else it'll fall off too easily.

Photos to follow! Don't have any yet... See ya next time!

Monday, August 24, 2009

Nylon Belt


Ta dah!!! My crocheted nylon belt!!!
Love it love it love it!!!

Finished it in one night, very easy to do.

Pattern:
Ch 13 + ch3 as first dc
R1: dc in 5th ch from hook, dc across
R2: ch3, turn, dc in next 2 st, ch 2, skip 2 st, dc in next 3 st, ch 2, skip 2 st, dc in next 3 st.
R3: ch 3, turn, dc in next 5 st, dc in next 3 st, dc in next 5st.
R4: Repeat row 2
R5: ch 3, turn, dc across
R6: Rep R5

Repeat Row 2 - 6, end with row 5.

Enjoy!

Sunday, August 9, 2009

Mini Doily (with Pattern)


My first try at making a mini Doily...
Got the inspiration from one the patterns from here. (Thank you Yasmine!)
(Can you guess which one? ;p )

Note:
Qc: Quadruple Crochet (or double treble crochet)
Yarn over 3 times, finish as usual.

Pattern:
Ch 4/5, join to make circle
R1: Ch 1, 9 sc in circle, join w/ sl st
R2: Ch 3, dc in same st, (2 dc in each st around), join w/ sl st {18 dc}
R3: (Ch 5, Qc in next st, ch 5, sl st in next st) repeat around
R4: Ch 5+4, (sc in top of Qc from row below, ch 4, Qc in sl st from row below, ch 4) repeat around, join with sl st to 5th ch of beginning chain.
R5: (Ch 5, sc into ch-4 sp, ch 5, sc into the same ch-4 sp, ch 5, sc into top of Qc from row below /alternate with sc on top of Qc) repeat around

DONE!

Please ask if the pattern is confusing, and do inform me if there's a mistake in the pattern.


I added a coconut shell button....


And made it into a brooch...

Fantastic... :D

Thursday, November 27, 2008

My Polygon Grannies Patterns

Alright, after experimenting with various polygonal grannies, I came up with a few patterns of my own!

Notes for Granny Patterns:
1. Always substitute first dc of row with ch3.
2. Always slst to next loop after joining the previous row.
(This is my personal preference, just so that the right side looks uniform. You may turn if you wish.)


Circle Granny in Hexagon
Magic circle or ch 5, join.
R1. (3dc, ch2) 6x in circle, join.
R2. [(3dc, ch3) in next loop] 6x, join.


Hexagon
R3. [(3dc, ch2, 3dc) in next loop, ch2] 6x, join.


Just as a comparison, this is the same pattern as above, only done in one colour.

---------------------------------------------


Circle Granny in Square
Magic circle or ch 6, join.
R1. (2dc, ch1) 8x in circle, join.
R2. [(3dc, ch2) in next loop] 8x, join.
R3. Repeat R2.


Square variation 1
R4. [(3dc ch3 3dc) in corners, ch 2, 3dc in next loop, ch 2] 4x, join.


Square variation 2
R4. [(3dc, ch2, 3dc) in corners, hdc, hdc, hdc, 3sc in next loop, hdc, hdc, hdc] 4x, join.

--------------------------------------------------


Octagon Granny
Magic circle or ch7, join.
R1. (2dc, ch1) 8x, join
R2. [(2dc, 1 ch, 2dc) in next ch1-sp] 8x, join.
R3. [(2dc, 1 ch, 2dc) in ch1-sp, 2dc in 0-ch sp] 8x, join.

Ta dah! That's it!
Please respect copyright and just don't claim my patterns as yours.
Thank you!

Polygon Grannies

Finally, after more than a week (or two) preparing for this post, it's done. At first I wanted to make it all into one post, but considering the number of photos, I decided to split the post into two. One is for the common granny patterns, and the ones I got from the internet, and the next post will be about the granny patterns that I made myself.

Anyway, I know granny patterns are so easy and straightforward to make, hence they're quite common on the internet to the point that it's hard to know who's the original copyright holder. (If anyone disagrees with me, please inform me.)

But I simply wanted to share with you every basic polygonal granny at one place, so here I am writing them all down for you, simplified in my style. With a few un-ordinary ones with links to the pattern origin.

Notes for Granny Patterns:
1. Always substitute first dc of row with ch3.
2. Always slst to next loop after joining the previous row. (Except for Half-Square)
(This is my personal preference, just so that the right side looks uniform. You may turn if you wish.)


Triangle Granny
Magic circle or ch 4, join.
R1. (4dc, ch2) 3x in circle, join.
R2. [(4dc, ch3, 4dc) in next loop, ch 1] 3x, join.
R3. [(4dc, ch3, 4dc, ch1) in ch3-sp, (4dc, ch1) in ch1-sp] 3x, join.


Half-Square Granny
Magic circle or ch3, join.
R1. ch3, 2dc, ch2, 3dc in circle.
R2. ch3, turn, 2dc in same space, ch1, (3dc, 2ch, 3dc, ch1) in ch2-sp, 3dc in 3rd-ch of previous round.
R3. ch3, turn, 2dc in same space, ch 1, (3dc, ch1) in ch1-sp, (3dc, 2ch, 3dc, ch1) in ch2-sp, (3dc, ch1) in ch1-sp, 3dc in 3rd-ch of previous round.


Square Granny
Magic circle or ch 6, join.
R1. (3dc, ch3) 4x in circle, join.
R2. [(3dc, ch3, 3dc) in next loop, ch1] 4x, join.
R3. [(3dc, ch3, 3dc, ch1) in ch3-sp, (3dc, ch1) in ch1-sp] 4x, join.


Pentagon Granny
Magic circle or ch 4, join
R1. (3dc, ch2) 5x in circle, join.
R2. slst to next loop, [(3dc, ch2, 3dc) in loop, ch1] 5x, join.
R3. [(3dc, ch2, 3dc, ch1) in ch2-sp, (3dc, ch1) in ch1-sp] 5x, join.


Star Granny
I got the pattern for this from here.


Hexagon Granny
I got the pattern for this from here.


Octagon Granny
I got the pattern for this from here.

Happy hooking!

Tuesday, November 18, 2008

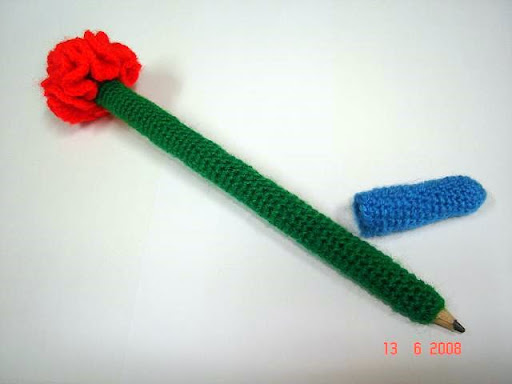
Pencil Cover Pattern

A few people have asked me about the pattern of this pencil cover that I've made months ago.

Thing is, this silly me didn't write down the pattern when I made it.
And now I've forgotten.

Well, usually I prefer to write patterns for things that can work with any type of yarn and any hook size because most of my yarns are so cheap they have got no label on it.

So I don't even know what's the type of yarn that I used for it. And I suppose the outcome of this project will be different with different types of yarn (and hook too). All I know, it's a very very thin yarn.

But it's ok, I suppose I'll just tell you the modus operandi.

It's mostly by trial and error actually.
Firstly you make a chain, check with your pencil n join. Next do sc into the ring and again check with your pencil. As long as the beginning ring is smaller than the body of the pencil, it's ok.
Then just continue doing sc in the round, and check again. If it fits the body of the pencil, then just keep going until you reach the top of the pencil. Don't forget to make sure it is tight enough so that your pencil won't pop out the top when you write with it.
I hope that makes sense.

This is what I did anyway (if I remember correctly):
sc 10 into magic ring. pull ring. you might want to do a double ring to make it more secure. or chain and join to make it even more secure.
Then simply so sc all the way in the round up to the top of the pencil.
(Note: My yarn needs 10 sc to fit the pencil. Yours might be different.)

For the flower, change to red, then do 2 sc in each st around till you're satisfied with the size.

Feel free to ask if you have any questions!

Wednesday, October 15, 2008

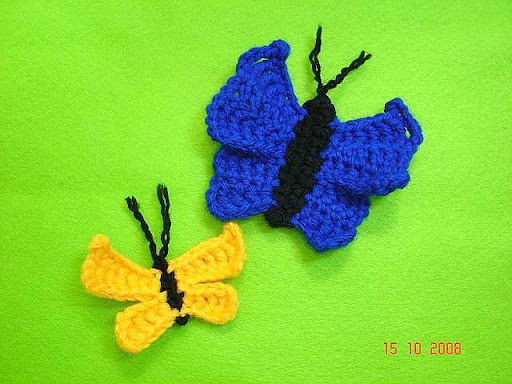
Blue Butterfly Free Pattern

Alright.. Since many people asks for it, here's the pattern for the blue butterfly!


Black or other dark colour:
Leave a tail before your slip knot for the antennae.
Ch 12, sc in 2nd ch from hook, sc 9x, 2 sc in last ch.
Go over to first ch in other side of foundation chain and do sc all the way, with 2 sc in the last ch.
Sl st n cast off.

Second colour:
Attach yarn to bottom right ch of body (counted as first ch), ch 7, tr to 5th ch from hook, tr, dc, hdc. Sl st to 3rd ch of body.
Ch 1, turn, sc 4x.
Ch 4, turn, tr, tr, dc, hdc. Sl st to 5th ch of body.
Ch 10, tr to 5th ch from hook, tr, tr, dc, dc, hdc. Sl st to 7th ch of body.
Ch 1, turn, hdc, dc, dc, tr, tr, tr.
Ch 4, 3 ch picot, tr, tr, tr, dc, dc, hdc. Sl st to 10th ch of body.
Ch 4, sl st to other side of body. Counted as 1st ch of body. (Left wing)
Ch 6, 3 ch picot, ch 4, tr, tr, tr, dc, dc, hdc. Sl st to 3rd ch of body.
Ch 1, turn, hdc, dc, dc, tr, tr, tr.
Ch 4, turn, tr, tr, tr, dc, dc, hdc. Sl st to 6th ch of body.
Ch 8, tr to 5th ch from hook, tr, dc, hdc. Sl st to 8th ch of body.
Ch 1, turn, sc 4x.
Ch 4, tr, tr, dc, hdc. Sl st to 10th ch of body.

Done!
Just split the antennae into two.

Please inform me if you find any mistakes in the pattern.

And show me some action photos if you can!

Thanks!

Sunday, October 12, 2008

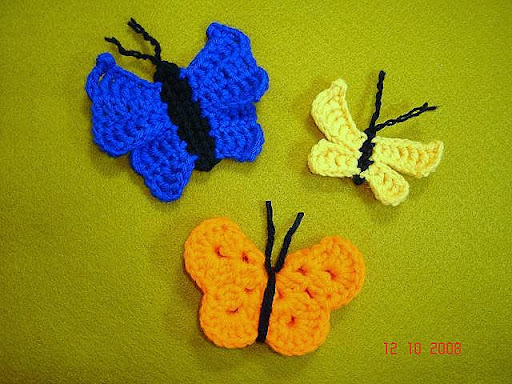
Butterflies + Free Pattern

I made these today.

Got the pattern for the orange butterfly here.

And since there seems to be a shortage of simple butterfly patterns here on the net, I came up with the other two patterns myself.

Do you like them?


Anyway, this is the pattern for the yellow butterfly:

Black or other dark colour as foundation: Ch 6, cast off leaving a length for the antennae.

Second colour:

Slst to first ch of foundation on the right

Ch 8, tr to 5th ch from hook, tr, tr, dc, hdc

Slst to 3rd ch of foundation

Ch 10, ch 3 picot, tr to 5th ch from hook, tr, tr, tr, dc, dc, hdc

Slst to 5th ch of foundation

Slst to other side of foundation via the back

Ch 6, ch 3 picot, ch 4, tr, tr, tr, dc, dc, hdc

Slst to foundation

Ch 9, tr to 5th ch from hook, tr, tr, dc, hdc,

Slst to foundation
Done!

Do you want the pattern for the blue butterfly also?


Thursday, August 14, 2008

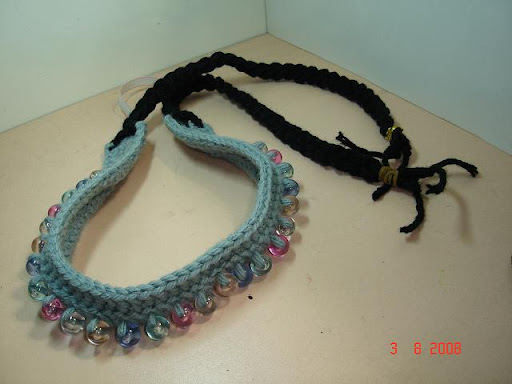
Free Pattern: Very Very Easy Crochet Headband

As a celebration for my international-selling launch, I want to share with you a pattern I've made a few days ago.

It is for the Grey Headband with Beads and Pigtails.


Firstly, pre-string 25 beads into your yarn.
Next, make a chain for as long as it goes from the behind of your left ear, all the way to your right ear. As for me, I made 70 ch.
R1: Ch 3, dc in 4th ch from hook, dc across.
R2: Ch 3, turn, dc in next 10 st, (dc with bead, dc) 25 times, dc in next 10 st.
R3: Ch 3, turn, dc across. FO

Pigtails:
Join black yarn to side of dc on first row. Ch 70, or as long as you like. Repeat for second and third row. (Three 70-chs made.)
Repeat for the other side of headband.
Make the pigtails on both sides of the headband.

Cut a length of rubber tape, measuring the back of your head. Attach to ends of headband.

Done!

Hope you enjoyed this pattern, feel free to ask anything.

Thursday, June 19, 2008

Free Pattern: Pencil Case

Okay, since someone over at craftster asked, I'm posting this pattern here.
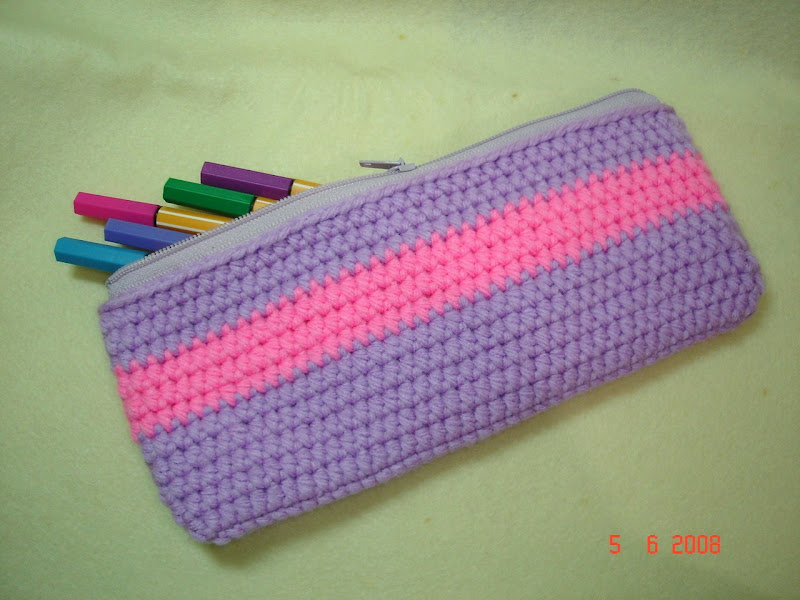
Note: The pencil case will be turned inside out, so turn it inside out first before doing any colour change. Keep the tails of the colour change on the inside.

ch 40
R1: ch 1, turn, do sc in next 39 st, 2sc in last ch. Go over to the opposite side of the foundation 40-ch and do sc all the way, with 2sc in last ch. You should have total 82 stitches in one row.
R 2-5: Just go over to the other side immediately. You should have total 82 stitches in one row. hdc in both loops all the way. Turn inside out here.
R 6-8: change colour and do hdc all the way.
R 9-11: change colour and do hdc all the way.

Note: If you want the colour change to be not too visible, you can join the rows with slip stitch instead of crocheting in the round.

Finalize: Turn it outside in again, and sew on the zipper to the top row of the last round, and make sure the zipper is upside down! Next, open the zipper and turn the pencil case inside out. To make it easier, you might want to mark your zipper first, about 1/8" from the edge

Of course, you can change the colours and the number of rows as you like.

I hope it is clear enough. Unfortunately I didn't take any pictures of the process, but the next time I make another one, maybe I will. And then post it here of course.


Copyright Melisa Sriwulandari 2008.
Please just link to this pattern if need be.


Saturday, June 14, 2008

Tutorial: Hyperbolic Crochet

Someone over at craftster asks me for a simpler way of explaining how to do a hyperbolic crochet so here it is!
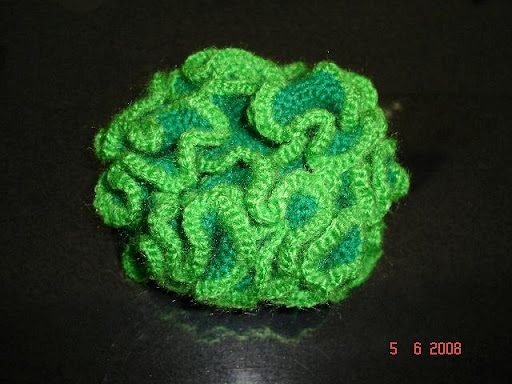

So, what I did was:
1. 6sc into magic ring, or ch 2 and 6 sc in 2nd ch from hook (whichever you prefer).
2. Do [1sc in next 2 stitches, 2sc in next 1 stitches] all the way until the size wanted (I did 15 rows approximately).
3. Change colour and do [2sc in next stitches] ONE round.

I hope it is clear enough.

Note: The possibility of Hyperbolic crochet is endless. You can do increase in every 2, in every 4, in every 10, 20, or 17, or whatever number you want. Or change the number of beginning sc in the ring.

PS. "approximately" is the beauty of hyperbolic crochet, I love the fact that we don't have to keep tab on how many rounds we've done, and simply do the same routine over and over again as much as we like.


Little warning: I used a very very thin yarn for this (I don't know what's the usual name for this yarn). Hence it is only a few inches wide. I don't know how big it'll be if you use a thick yarn.

Copyright Melisa Sriwulandari 2008.
Please just link to this pattern if need be.

Subscribe now via email

Enter your email address:

Powered by FeedBurner

Google