Showing posts with label tutorials. Show all posts

Sunday, January 11, 2009

Another Pencil Case

I made another pencil case. This time, my cousin requested it from me.

I don't know why, but I always procrastinate at sewing on the zipper stage. Maybe it's because since I learnt how to crochet, I start to dread hand sewing. Even though it is actually very easy and doesn't take that much time to finish.

Anyway, just happens that I have 3 shades of red, so she asked for a few rows of each plus a bit of black. It's colour is similar to the bag I made a while ago, as this time I also crocheted the red yarn together with a thin brown yarn.


Well, I did say at the beginning of this year that I'm going to share more about how I do things, so here it is.

How I Sew on the Zipper

1. Draw a line 4mm from the edge of the zipper. (Due to me being a perfectionist. Expect lines on things I sew.)
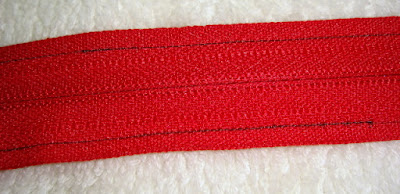


2. Turn the pencil case inside out. I usually sew on the zipper at the place just below the V's of the top row. Somewhere along the dotted line. I hope the picture is clear enough.


3. Position the zipper at the edge of one side of the pencil case and start sewing.


4. Position the other side of the zipper and sew it on.


As it happens, I have a long excess of zipper. Which is very sad, as I don't know what to do with it after I cut it off. Thing is, where I bought them only have 2 lengths and the other one is too short. You know what, next time I make a pencil case, I'll make the length according to the shorter zipper. That way I won't waste anything.


5. Turn the pencil case right side out. Then sew on some safety stopper to keep your zipper from going over the edge.


6. Tuck in the zipper and cut at a safe length.


7. Ta dah!!!


Here's a bigger picture of the pencil case, too bad the photo really don't do the real colours justice at all.


Monday, December 15, 2008

Recycled Envelopes

I'm the type of person who doesn't like to throw anything away. So I've been keeping all the brochures I got, thinking I'll find a use for them someday.

Of course, yesterday I got this idea to make them into envelopes, cos all these time I've been sending my packages using regular brown envelopes that I bought at the stationery shop, and I thought, why buy when I can make them myself?


They're so simple to make too.. Simply tape the sides together and it's done.


Next, I reused the blank side of the paper that I printed wrongly to write the address on.


Voila! Killed 2 birds with one stone. I got a cheap envelope, I don't have to buy any, and I reduced, reused and recycled all at once.
It's even stronger than regular paper if the brochure is the glossy kind of paper.
And the best part is, I got to reduce my guilt towards the earth too...

Cookie Monsters


I sent off these Cookie Monsters to their new home today. Yippee!


To be secure, I attached the rubber band 3 times.
1. I glued it with glue gun.
2. I sewed it with thread.
3. I glued a ribbon on top of it.


Hopefully it'll last a long time!

Monday, November 3, 2008

Glitter Glue Tutorial

I'm sure you're familiar with this kind of glitter glues that you can easily buy everywhere. It is easy to use, and most importantly: not messy.


But how about these kind?


This is the kind of glitter most people avoid. Very potentially messy, and very very very frustrating.
But what if you have some at home, some long ago forgotten few, or perhaps given by someone else? Or maybe you want a colour that doesn't exist in those packaged ones?

The solution is, of course, to make the glitter glue yourselves.

Here you go!

STEP 1.
Get ready your glitters.
Get ready some clear glue. As much as you estimate you need for the amount of glitter you have.
Get ready some empty glitter glue pen. You can wash them first if you wish.
Or, if you don't have any, get an empty glue bottle. (Like me!)

The only reason why I bought this glue is because of the cap/nozzle. Please do not buy those with the mesh. The glitter wont be able to get through those. And if you take off the mesh, the gaping hole will be too big to squeeze out your glitter.


STEP 2.
Get ready some reasonably big scrap piece of paper where you'll be working on.
Pour some glue to the bottom of the bottle.
Pour your glitter.
Pour a little bit more glue.
Pour some more glitter.
Repeat those steps until you ran out of glitter.
You may also twirl the bottle sideways to mix them up halfway the process.


You might want to try to salvage the jumping glitters from the paper later on, and pour it into the bottle. But my suggestion is, don't bother. Just throw them all away to the bin. Unless you accidentally spilled a whole lot of them glitters. (Please don't!)


Viola! It's done! (Picture on above right)
Just keep rolling the bottle until they're properly mixed.

Of course, you can get separate bottles for separate colours if you wish. Unless you want to get rid of all your glitter stash at once, like me!


Please don't bother to get those few dust at the bottom of the tubes. When dealing with glitters, perfection is futile.

Hopefully I haven't forgotten anything. Please do ask if you have any questions!

Check out the testing result!


Fantastic or what?

Note: when using any glitter glue, do PASTE the thing you're going to glitter onto the paper FIRST before you apply the glitter. Why? Because the paper will wrinkle.

So far so good. Other than the fact that the glitter will accumulate at the bottom and that the amount of glitter coming out is quite unpredictable, everything is working just fine. You can also easily turn it upside down to mix them evenly before use. And you might also want to use some toothpicks to even out the glitter. And don't forget to wipe clean the nozzle after use!

Enjoy!

Saturday, June 14, 2008

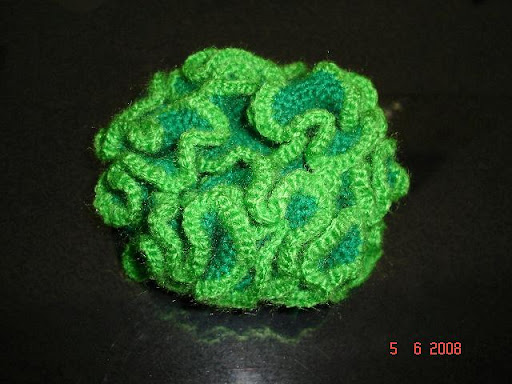
Tutorial: Hyperbolic Crochet

Someone over at craftster asks me for a simpler way of explaining how to do a hyperbolic crochet so here it is!


So, what I did was:
1. 6sc into magic ring, or ch 2 and 6 sc in 2nd ch from hook (whichever you prefer).
2. Do [1sc in next 2 stitches, 2sc in next 1 stitches] all the way until the size wanted (I did 15 rows approximately).
3. Change colour and do [2sc in next stitches] ONE round.

I hope it is clear enough.

Note: The possibility of Hyperbolic crochet is endless. You can do increase in every 2, in every 4, in every 10, 20, or 17, or whatever number you want. Or change the number of beginning sc in the ring.

PS. "approximately" is the beauty of hyperbolic crochet, I love the fact that we don't have to keep tab on how many rounds we've done, and simply do the same routine over and over again as much as we like.


Little warning: I used a very very thin yarn for this (I don't know what's the usual name for this yarn). Hence it is only a few inches wide. I don't know how big it'll be if you use a thick yarn.

Copyright Melisa Sriwulandari 2008.
Please just link to this pattern if need be.

Sunday, March 23, 2008

Tutorial No. 2: Making a Knot at the end of your Thread

Hi friends... I notice that there are a lot of people out there who struggle when making a knot for hand sewing. I thought it's not fair that I'm having such an easy time while others not, so here I am sharing this knot-making to you. I've known this ever since forever, so I must have learnt it from my mom. Hopefully it will be useful for you as it does for me. Apologies for the bad pictures, I'm not a good photographer, not making it easier that I'm doing it with one hand too. :D
Please clarify with me if there's anything confusing. Enjoy!


1. Get your thread and needle ready.

Siapkan jarum dan benangnya.


2. Put the tip of your thread on your left index finger and press it down with the needle.

Letakkan ujung benang di ujung jari telunjuk kiri dan tekan dengan jarumnya.


3. Loop the thread around your needle.

Lingkari jarum dengan benang.


4. Loop some more. The more loops, the bigger the knot. Usually I do 5. Not too big, not too small. Just the right size.

Tambah lagi seperti di gambar. Semakin banyak, semakin besar hasilnya. Biasanya aku bikin 5.


5. Press the loops together.

Padatkan menjadi satu.


6. Press it with your thumb.

Tekan dengan jempol.


7. Pull the needle out of your thumb in the direction of the arrow. Make sure you keep your left fingers pressed together on the knot.

Tarik jarum searah panah di gambar.


8. Pull all the way.

Tarik sampai habis.


9. Done! You have a neat knot at the end of your thread.

Selesai!


Tutorial No. 1: Attaching Ribbon For Keychain

This is what I do when I forgot (quite often too, lol) to attach the ribbon in between the pieces when I sew them. Hopefully it'll be of use to you. Enjoy!

First, we have the cute thing we want to attach the ribbon to.
The ribbon too of course. And don't forget to plug in your glue gun.

Pertama, siapkan kreasi yang mau ditempelin pita, pitanya, dan lem tembak.


Second, I put a dab of glue using my glue gun.

Dua, beri sedikit lem di tempat yg sesuai...


Attach the ribbon and press it flat.

Tempel salah satu ujung pita dan tekan dengan jari.


Put another dab of glue.

Beri sedikit lem lagi di atasnya.


Close the ribbon. Press it flat again.

Tempel ujung pita yang satu lagi dan tekan dengan jari.


Another dab of glue.

Beri sedikit lem lagi...


The important part: Press the still hot glue with your thumb.

(Not too hot that it'll hurt your finger, but not too cool that it can't be shaped anymore.)

Bagian yang paling penting: tekan dengan jempol ketika masih sedikit panas.

(Pastikan lem belum terlalu dingin sehingga tidak bisa dibentuk lagi. Hati2, kalau masih terlalu panas, kulit jari bisa terkelupas.)


We want to press the glue so that it'll have a clean look, compared to what it will looks like otherwise.

Perlu ditekan dengan jari supaya hasil akhirnya bersih dan rapi.


There you go. Just attach the keychain to the ribbon and you're done!

Terakhir, tambahkan gantungan kunci dan selesai!


Subscribe now via email

Enter your email address:

Powered by FeedBurner

Google