


I made another pencil case. This time, my cousin requested it from me.
I don't know why, but I always procrastinate at sewing on the zipper stage. Maybe it's because since I learnt how to crochet, I start to dread hand sewing. Even though it is actually very easy and doesn't take that much time to finish.
Anyway, just happens that I have 3 shades of red, so she asked for a few rows of each plus a bit of black. It's colour is similar to the bag I made a while ago, as this time I also crocheted the red yarn together with a thin brown yarn.

Well, I did say at the beginning of this year that I'm going to share more about how I do things, so here it is.
How I Sew on the Zipper
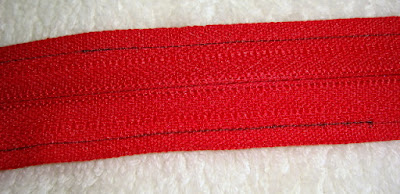
1. Draw a line 4mm from the edge of the zipper. (Due to me being a perfectionist. Expect lines on things I sew.)
2. Turn the pencil case inside out. I usually sew on the zipper at the place just below the V's of the top row. Somewhere along the dotted line. I hope the picture is clear enough.

3. Position the zipper at the edge of one side of the pencil case and start sewing.

4. Position the other side of the zipper and sew it on.

As it happens, I have a long excess of zipper. Which is very sad, as I don't know what to do with it after I cut it off. Thing is, where I bought them only have 2 lengths and the other one is too short. You know what, next time I make a pencil case, I'll make the length according to the shorter zipper. That way I won't waste anything.

5. Turn the pencil case right side out. Then sew on some safety stopper to keep your zipper from going over the edge.

6. Tuck in the zipper and cut at a safe length.

7. Ta dah!!!

Here's a bigger picture of the pencil case, too bad the photo really don't do the real colours justice at all.

I don't know why, but I always procrastinate at sewing on the zipper stage. Maybe it's because since I learnt how to crochet, I start to dread hand sewing. Even though it is actually very easy and doesn't take that much time to finish.
Anyway, just happens that I have 3 shades of red, so she asked for a few rows of each plus a bit of black. It's colour is similar to the bag I made a while ago, as this time I also crocheted the red yarn together with a thin brown yarn.
Well, I did say at the beginning of this year that I'm going to share more about how I do things, so here it is.
How I Sew on the Zipper
1. Draw a line 4mm from the edge of the zipper. (Due to me being a perfectionist. Expect lines on things I sew.)
2. Turn the pencil case inside out. I usually sew on the zipper at the place just below the V's of the top row. Somewhere along the dotted line. I hope the picture is clear enough.
3. Position the zipper at the edge of one side of the pencil case and start sewing.
4. Position the other side of the zipper and sew it on.
As it happens, I have a long excess of zipper. Which is very sad, as I don't know what to do with it after I cut it off. Thing is, where I bought them only have 2 lengths and the other one is too short. You know what, next time I make a pencil case, I'll make the length according to the shorter zipper. That way I won't waste anything.
5. Turn the pencil case right side out. Then sew on some safety stopper to keep your zipper from going over the edge.
6. Tuck in the zipper and cut at a safe length.
7. Ta dah!!!
Here's a bigger picture of the pencil case, too bad the photo really don't do the real colours justice at all.


 Stumble It!
No comments:
Post a Comment